One of our loyal followers asked if I would post the recipe Bill mentioned in his Sweet Potato post (OK, she's my sister-but I'd like to think that even if she wasn't, she'd still read my blog!) Ask, and ye shall receive! I love this recipe for a few reasons--first, it's delicious! Second, it's easy--dump all the ingredients in your slow cooker, turn it on, and when you come home from work dinner's ready & waiting for you--what could be better? Finally, it's very forgiving. Don't have one of the ingredients? Don't like one of the ingredients? Swap it out for something else. It'll still be good, I promise.
What you'll need
1 TBS olive oil
1 1/2 cups chopped onion
1 cup sliced carrots
1 TBS curry powder
1 tsp brown sugar
1 tsp grated fresh ginger
2 cloves minced garlic
1 serrano chile, seeded and minced
3 cups cooked chick peas
1 1/2 cups cubed, peeled sweet potato
1 cup diced green bell pepper
1 cup green beans
1/2 tsp salt
1/4 tsp pepper
1 can (14.5 oz) diced tomato (undrained)
1 can (14.5 oz) vegetable broth
3 cups baby spinach
1 cup light coconut milk
6 lemon wedges
cous cous
What to do
Heat oil in a nonstick skillet over medium heat. Add onion and carrot, cover and cook for 5 minutes until tender. Add curry powder, brown sugar, ginger, garlic and chile. Cook for one minute, stirring constantly. Place onion mixture in a 5 qt. slow cooker, and add the next 8 ingredient (through the broth). Cover & cook on high for 6 hours (or until the veggies are tender). Add the spinach & coconut milk and stir until the spinich wilts. Serve over cous cous with lemon wedges.
Give it a try, and let me know what you think. And if you've got a favorite recipe that you'd like to share with us, we'd love to hear it!
Sunday, March 21, 2010
Thursday, March 18, 2010
My Sweet, Sweet Potato
Growing up, it seems the only time I ever saw sweet potatoes was at Thanksgiving. Quartered and chopped, swimming in a pool of butter and brown sugar with semi-charred marshmallows piled on top. I know a lot of you out there know what I'm talking about. It was the dish right next to the green jello salad. As a kid's perspective, it was like getting dessert before actually getting through the main course. Just thinking about it raises my blood sugar. Today, as an adult, we see sweet potatoes prepared in a variety of different ways. They are not just a Thanksgiving staple anymore. But, also used as a more healthy substitute for the standard potato. Full of complex carbohydrates, beta carotene, and Vitamin C. Not to mention, ranking in one of the highest fiber contents of all vegetables.
This being said, the sweet potato has become a big part of our culinary endeavors. Steak and baked potato has become steak and baked sweet potato. Roasted pork loin with mashed potatoes has, yes you guessed it...mashed sweet potatoes. There is so many ways to introduce sweet potatoes into your meals.
Marin makes this vegetarian dish with sweet potatoes, chickpeas, raisins, and some other things I can't remember. But, it's poured over cous cous. It's awesome. Maybe she can put it on here sometime. Don't get me wrong. I love the good ole' common potato just as much as the next person. In fact, we grow those as well. But, having sweet potatoes in the garden offers us variety. Let's us shake things up a bit.
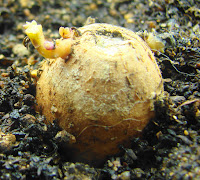
Now, let's talk about growing them. First, you could go out and buy "slips" to plant in your garden. But, for all of you who like a more hands on approach, try this. Pick yourself up a sweet potato and toothpicks from the store or your pantry if applicable. Cut the potato in half. Fill a wide mouthed jar with warm water. Take 3 toothpicks and stick them into the sweet potato. These will hold the sweet potato in place as you submerge the sweet potato into the glass of water. Only half of the potato should be submerge. Many may have done this very same process back in grade school science class. All that's left is to keep your potato warm over the next couple of weeks. You will begin to see roots forming on the lower half and the "slips" emerging on the top half. This is, however, possible to do by placing the cut side down into a pot of soil. As you can see in the pictures below, I have 4 potatoes at different stages of growth. This is the first year trying it in soil, but the above method has always worked. 1 sweet potato is capable of growing up to 50 slips. Each slip is capable of producing several pounds of sweet potatoes.


This being said, the sweet potato has become a big part of our culinary endeavors. Steak and baked potato has become steak and baked sweet potato. Roasted pork loin with mashed potatoes has, yes you guessed it...mashed sweet potatoes. There is so many ways to introduce sweet potatoes into your meals.
Marin makes this vegetarian dish with sweet potatoes, chickpeas, raisins, and some other things I can't remember. But, it's poured over cous cous. It's awesome. Maybe she can put it on here sometime. Don't get me wrong. I love the good ole' common potato just as much as the next person. In fact, we grow those as well. But, having sweet potatoes in the garden offers us variety. Let's us shake things up a bit.
Now, let's talk about growing them. First, you could go out and buy "slips" to plant in your garden. But, for all of you who like a more hands on approach, try this. Pick yourself up a sweet potato and toothpicks from the store or your pantry if applicable. Cut the potato in half. Fill a wide mouthed jar with warm water. Take 3 toothpicks and stick them into the sweet potato. These will hold the sweet potato in place as you submerge the sweet potato into the glass of water. Only half of the potato should be submerge. Many may have done this very same process back in grade school science class. All that's left is to keep your potato warm over the next couple of weeks. You will begin to see roots forming on the lower half and the "slips" emerging on the top half. This is, however, possible to do by placing the cut side down into a pot of soil. As you can see in the pictures below, I have 4 potatoes at different stages of growth. This is the first year trying it in soil, but the above method has always worked. 1 sweet potato is capable of growing up to 50 slips. Each slip is capable of producing several pounds of sweet potatoes.


Now that your slips are growing leaves, place them in a sunny window. Sweet potatoes are warm season crops. Here in Austin, we are zone 8b. Suggested time of planting slips is around the middle of April. Once your slips are around 6 inches or so, you can twist them off the "mother". Fill a shallow dish with warm water and lay the root end in the water with the leaves hanging out. Within a few days your slips will be rooted and they can be placed in your garden beds. Keep in mind, the sweet potato plant is a vine. Give it plenty of depth to produce the "tubers" as they grow underneath the soil. Although they can grow in all different types of soil, the less compacted the better. Now as for the vine, it will creep, climb, cover, stretch, and branch out all over the place. If the vine is allowed to crawl on the ground it will root itself along the way. The more rooting, the more potatoes. These can also be used as an ornamental in the landscape as a temporary privacy screen if trained up a trellis. Keep your vines evenly watered, especially while they are producing their tubers. We usually harvest around the end of July. When harvesting, be very gentle. Place your shovel or garden fork in the soil and lift the soil up to loosen it. Once loosened, we generally use our hands to dig out the sweet potatoes. You will have some small potatoes mixed in as this is normal. After basking in the glory of your harvest, it's time to cure them. Do not be tempted to wash or eat your sweet potatoes right away. They are still fairly tender and any nick, scrape, or cut can cause them to rot. Instead, leave the soil on and place them in a dry area for about a week or 10 days. This stage is crucial for best tasting sweet potatoes, otherwise they will be starchy, even gluey. Unless you were that kid in art class who liked eating the paste. (Okay, okay. I liked it then but I don't anymore. Just Kidding) This curing period allows the starches to turn to sugar, thus making a more sweeter potato. After this period, they can be scrubbed cleaned and eaten. Store them in a dark and dry environment. That's all there is to it. Low maintenance, large producer, and good to eat... My kinda veggie!
Sunday, March 14, 2010
Escarole - Endive's less well known (but much tastier!) cousin
Hey everybody, this is Marin. I'll be honest with you--I don't have Bill's gardening knowledge and expertise, but what I do know about is harvesting, storing, cooking and EATING the delicious food that comes out of our garden.
One of our favorite crops to grow is escarole. Escarole (a variety of broad leaf endive) can be cooked, or used raw in salads. It grows extremely well here in Texas. We planted ours from seed back in September, and it's been producing ever since!
 The key is to harvest the outer leaves only--leave the heart intact, and it will keep growing back! Last weekend I harvested an entire laundry basket full of escarole leaves and the plants are already overflowing out of the raised bed again!
Since I knew we wouldn't be able to eat ALL that escarole, I froze most of it--just blanch it first in a pot of boiling water for about five minutes. Then I put it in the food processor and pulsed it a few times--just to chop it up a bit. After that, I tossed it into some quart size freezer bags and popped it into the freezer. Voila! Now I've got a huge stash of delicious escarole on hand for the next time I feel like making my ALL TIME favorite recipe--escarole and beans! You might be saying to yourself, "Escarole and beans? What the heck is that?". Well, my friends, escarole and beans is the ultimate comfort food--and EASY to make--looks yummy huh? (Well, it's not the greatest picture in the world, but trust me, it's good!)
 What you'll need
1/3 cup olive oil
4-5 good sized cloves of garlic
1 head of escarole - torn
2 cans great northern beans, undrained
1/2 cup chicken broth
1-2 tsp. lemon juice
Pinch of crushed red pepper
Parmesan cheese
Salt & epper
Italian bread
What you do
Heat the olive oil over medium heat.
Add the garlic and saute for about 2 minutes.
Add the escarole, lemon juice and crushed red pepper.
Stir to coat the escarole with the olive oil/garlic mixture.
Cover and continue cooking for a few minutes-this allows the escarole to soften and wilt a bit.
Add both cans of beans and the chicken broth
Season with salt, pepper and parmesan
Turn the heat down to Low/Medium and continue cooking for 15 minutes, stirring occasionally.
Smash/smoosh the beans a bit
Continue cooking over medium heat
Heat your oven to 350, and pop in some thick slices of Italian bread-you're almost done!
When your bread is nice and toasty, it's time to get your bowls ready! (Bill and I differ on this next point--he likes to keep his bread whole, I like to tear mine up into bite sized pieces--you can do whatever works for you)
Ladle a generous portion of the escarole and bean mixture over your bread, and top with more parmesan.
I hope you enjoy this dish as much as I do--bon appetit!
One of our favorite crops to grow is escarole. Escarole (a variety of broad leaf endive) can be cooked, or used raw in salads. It grows extremely well here in Texas. We planted ours from seed back in September, and it's been producing ever since!

Since I knew we wouldn't be able to eat ALL that escarole, I froze most of it--just blanch it first in a pot of boiling water for about five minutes. Then I put it in the food processor and pulsed it a few times--just to chop it up a bit. After that, I tossed it into some quart size freezer bags and popped it into the freezer. Voila! Now I've got a huge stash of delicious escarole on hand for the next time I feel like making my ALL TIME favorite recipe--escarole and beans! You might be saying to yourself, "Escarole and beans? What the heck is that?". Well, my friends, escarole and beans is the ultimate comfort food--and EASY to make--looks yummy huh? (Well, it's not the greatest picture in the world, but trust me, it's good!)

1/3 cup olive oil
4-5 good sized cloves of garlic
1 head of escarole - torn
2 cans great northern beans, undrained
1/2 cup chicken broth
1-2 tsp. lemon juice
Pinch of crushed red pepper
Parmesan cheese
Salt & epper
Italian bread
What you do
Heat the olive oil over medium heat.
Add the garlic and saute for about 2 minutes.
Add the escarole, lemon juice and crushed red pepper.
Stir to coat the escarole with the olive oil/garlic mixture.
Cover and continue cooking for a few minutes-this allows the escarole to soften and wilt a bit.
Add both cans of beans and the chicken broth
Season with salt, pepper and parmesan
Turn the heat down to Low/Medium and continue cooking for 15 minutes, stirring occasionally.
Smash/smoosh the beans a bit
Continue cooking over medium heat
Heat your oven to 350, and pop in some thick slices of Italian bread-you're almost done!
When your bread is nice and toasty, it's time to get your bowls ready! (Bill and I differ on this next point--he likes to keep his bread whole, I like to tear mine up into bite sized pieces--you can do whatever works for you)
Ladle a generous portion of the escarole and bean mixture over your bread, and top with more parmesan.
I hope you enjoy this dish as much as I do--bon appetit!
Friday, March 12, 2010
To Bee, Or Not To Bee
Last year, I went to It's About Thyme nursery in South Austin to look around at some of the fruit trees that they had available. I have always wanted to grow fruit. After all, sometimes it can get tedious growing veggies all of the time. I had considered it a new challenge. I took my time as I walked around, looking at what I could possibly cram into every inch of available space. Then I realized...These trees won't stay this small forever. Well, on to Plan B. I considered many varieties based on size, our likes and dislikes, dwarf, semi-dwarf, standard, self fertile and semi self fertile. Wow! That is a lot to take in. My prior research on the web and watching countless Youtube videos was paying off. I chose a dwarf fig, a dwarf Hosui pear, and a semi-dwarf peach. Although these are dwarf varieties, they will still get a little bit of height to them. And the best part is, they could be planted in containers. We picked out some large enough pots, dropped them in with some good organic soil, and watered them deeply. That's it. All we had to do is wait for them to produce.


Needless to say, we were not yielding bushels that season. The fig was too young and the asian pear required another variety in order to pollinate. However, the pear did produce 1 fruit, but Josh accidentally bumped into the tree and knocked it off. Marin was looking forward to eating it. She had called "dibs" on it every since it was a little baby pear. So another trip to the nursery was in order for another pear tree. This time a Shinko asian pear was added to our collection. With the new pear tree potted, there shouldn't be any problem with them getting pollinated. Once they start blooming, the bees will come in and carry the pollen from tree to tree, thus completing the requirements to produce the fruit. Which... brings us to the topic I
would like to share with you, today.

Bees are such an important part of our garden. As soon as the weather warms up, they are out in full force. Collecting as much pollen as they can for their hive and at the same time, pollinating our fruits and veggies. However, it is the middle of March and the spring garden has no goodies for them to partake from.
Except....OUR PEACH TREE. Yes, our peach tree is in full bloom right now! And not a bee in sight. It apparently is still too cold for them. We did not realize this last year, so this year we have to take action. We must do our own pollination on our peach tree. This is the only early bloomer we have. So, armed with a soft bristel paint brush, I put on my bumblebee costume from the 4th grade talent show(Just Kidding!) and "beelined" for the peach tree. Excuse the bad humor. When hand pollinating, the object is to lightly brush the pollen from the top of the male filaments that are surrounding the central stigma(female). Pollen collects on the anthers of the male. Basically, we are brushing the pollen from the tips of the male organ and placing it onto the female stigma. Check out the pictures to get a better understanding. There is only a short window to do this, so act quickly. The female is only receptive for so long. Just look at all the filaments around the stigma. You will see tiny yellow clouds of pollen on the tips. Just brush and touch to the stigma. That's it. You are done. Just check back to see if any more blooms open from time to time and do the same for them.


Bees are a very important part of the garden and some day, we would love to start our own hive. But until then, our peach tree will have to get used to us getting the job done. So, if you have early bloomers like a peach tree, you may have to hand pollinate them before the bees ever come out to play. We will definately keep you updated on the status and anxiously await the fruits of our labor. This weekend is spring garden planting time! So, more to come very soon.
Monday, March 8, 2010
Vegetable Gardening: The Basics
Several elements come into play when planning a garden. Like all living things, food and water is needed to survive. First, we will start with a proper foundation for our garden. Having fertile soil is very important in achieving a successful garden. Here in Austin, Tx, the soil is riddled with limestone. It is next to impossible to dig down more than a couple of inches before hitting rocks. We have tried many times to plant directly in the soil with very little if any success. For this very reason, it is why we chose to set up raised beds. Starting with the right soil will take a lot less work and the results will be rewarding. We chose to have good organic soil delivered to fill our beds. This was an expense well worth it's price in gold! The veggies we planted last spring hardly needed any help whatsover. Our soil is a mixture of compost, aged manure, rice hulls, and some decomposed granite for help in drainage. There is a ton of organic material throughout. Within weeks, our beds were the newest attraction for the worms. They were everywhere! They will tunnel through providing aeration to the soil and leave behind little worm "poo" to help feed the plants. Our soil has become very "fluffy" and doesn't dry out very quickly. So start them off right with the best foundation possible.


The other important element is water! This will make or break your garden. Here in Texas, the summers are brutal. Sometimes 30+ straight days of above 100 degrees. The spring garden here is a race against time, so getting an early start is very important for your tomato and pepper transplants. Also, your leafy green veggies will not hesitate to bolt. The summer heat will eat them alive if your timing isn't right. We found that a minimum of 6 hours of direct sunlight was plenty for the garden. More would be better possibly but this is what we have available and everything seems to grow well. Our new side yard addition will get a bit more sunlight which will help in our tomato, pepper, and melon yields. As long as water is available, they should do well. It is extremely important to keep the garden well mulched. MULCH, MULCH, MULCH!!! Use whatever you have available. Compost, dried leaves, dried grass clipping, wheat straw, pine mulch, you get the idea. This will help retain the moisture in your beds and also keep your plants root from drying out. Whether you water by hand or use a drip or soaker method, make sure your babies don't get too thirsty. On the other hand, make sure you don't drown them either. We water deeply at fewer intervals. One thing we are planning to do is harvesting rainwater. Once I can find some proper containers and install gutters and downspouts, we should be able to reduce our water bill. But, that is a project we will put on the list. (Baby steps, remember) We plan to give you a step by step of the project. So keep watching soon!


When July arrives, we try to have most everything ready to harvest. Some things we'll let bolt to collect seeds for future plantings. We will give the garden a "rest" and make preparations for round 2. Yes! That's right! Our fall garden, or as sometimes Marin and I call the "second chance garden". This past fall we seeded the beans and peas too late and they were destroyed by the freeze. We let the peppers continue where they are. Once the temps drop they will start producing again until a freeze. We try to get a second crop of everything but replacing some crops for others. For example, we will replace the watermelons grown in spring for pumpkins in the fall. Spinach and Escarole will replace a majority of the summer salad mix. Spinach and escarole freezes well. Broccoli is seeded and overwinters well here. Cabbage very much the same, however, seems to be very slow growing where we planted it in the garden. Garlic is planted for harvest the following spring. As you can see, we try to make use out of any space or time available. Our goal is to be able to eat fresh produce when it's available and to freeze, dry, can, store, and preserve what we can.
Well, that's it in a nutshell. As long as you give your garden a proper start and plan ahead accordingly, there should be no reason you can't grow healthy food for yourself and your family. Give your veggies a happy life and they will do the same for you.

If your soil is tired out and void of all nutrients, try mixing in compost that is rich in organic material. I can't stress enough how much composting has improved our garden. We have a pile in the back corner of the garden that we throw leaves, grass clippings, veggie peels, coffee grounds, and much more. It seems to pretty much take care of itself from there. All we have to do is keep it moist and turn it once in a while. And the best part about it is it's FREE! Your garden soil will love it year after year and so will your veggies. Try not to make it too complicated. If your compost doesn't heat up that's ok. Our pile has never heated up and we still get good results. We just pile it on and let nature take care of the rest. When we want to side dress our veggies or use it as mulch, we just screen it and apply. Also, we will take a couple of handfuls of our compost and brew some compost tea in a 5 gallon container. Throw in some air stones to provide oxygen and some food for the beneficial bacteria. We use about 1oz. of molasses mixed in. We let this go for a couple of days then strain out the liquid. Make sure your tea has an earthy smell with a hint of yeast. Do not use a brewed tea that has an unpleasant smell!!! We then dilute it at a 4:1 mix with water. This is either sprayed on the foliage or drenched in the soil for the plants roots to take up. Every couple of weeks will suffice and provide beneficial nutrients to your crops.


The other important element is water! This will make or break your garden. Here in Texas, the summers are brutal. Sometimes 30+ straight days of above 100 degrees. The spring garden here is a race against time, so getting an early start is very important for your tomato and pepper transplants. Also, your leafy green veggies will not hesitate to bolt. The summer heat will eat them alive if your timing isn't right. We found that a minimum of 6 hours of direct sunlight was plenty for the garden. More would be better possibly but this is what we have available and everything seems to grow well. Our new side yard addition will get a bit more sunlight which will help in our tomato, pepper, and melon yields. As long as water is available, they should do well. It is extremely important to keep the garden well mulched. MULCH, MULCH, MULCH!!! Use whatever you have available. Compost, dried leaves, dried grass clipping, wheat straw, pine mulch, you get the idea. This will help retain the moisture in your beds and also keep your plants root from drying out. Whether you water by hand or use a drip or soaker method, make sure your babies don't get too thirsty. On the other hand, make sure you don't drown them either. We water deeply at fewer intervals. One thing we are planning to do is harvesting rainwater. Once I can find some proper containers and install gutters and downspouts, we should be able to reduce our water bill. But, that is a project we will put on the list. (Baby steps, remember) We plan to give you a step by step of the project. So keep watching soon!


When July arrives, we try to have most everything ready to harvest. Some things we'll let bolt to collect seeds for future plantings. We will give the garden a "rest" and make preparations for round 2. Yes! That's right! Our fall garden, or as sometimes Marin and I call the "second chance garden". This past fall we seeded the beans and peas too late and they were destroyed by the freeze. We let the peppers continue where they are. Once the temps drop they will start producing again until a freeze. We try to get a second crop of everything but replacing some crops for others. For example, we will replace the watermelons grown in spring for pumpkins in the fall. Spinach and Escarole will replace a majority of the summer salad mix. Spinach and escarole freezes well. Broccoli is seeded and overwinters well here. Cabbage very much the same, however, seems to be very slow growing where we planted it in the garden. Garlic is planted for harvest the following spring. As you can see, we try to make use out of any space or time available. Our goal is to be able to eat fresh produce when it's available and to freeze, dry, can, store, and preserve what we can.
Well, that's it in a nutshell. As long as you give your garden a proper start and plan ahead accordingly, there should be no reason you can't grow healthy food for yourself and your family. Give your veggies a happy life and they will do the same for you.
Sunday, March 7, 2010
Preparing For Spring
Spring garden time is here! The soil is prepped, the seedlings have been sprouting indoors, and my pots and containers are ready to fill. The temperatures are rising so I have been "hardening off" the seedlings slowly throughout the week.

Our spring garden has almost doubled in size this year with the addition of 6 raised beds on our small south-facing side yard(5'x50'). These new beds will host sweet corn, brandywine, roma, cherry and yellow pear tomatoes, 2 kinds of melons, and sweet and hot peppers.

Our backyard garden area(16'x30') consists of 7 long beds, 4 short beds, and about 20 feet of amended ground soil along the back fence.


These will host pole beans on a trellis, some additional heirloom tomatoes, even more roma tomatoes, peppers, red and white onions, spring onions, garlic(planted in fall) , potatoes, carrots, herbs, cabbage, arugula and other salad mixes, collard greens, okra, radishes, escarole and kale. We also have an area (10'x10')on our deck for bush sugar baby watermelons grown in spring in a baby pool and used in fall for pumpkins. There is a trellis for our Straight Eight cukes and our Pickling cukes as well. We have 2 varieties of semi dwarf asian pear trees, 1 fig, a dwarf peach tree, and a small spot for berries. And if that was not enough, we will have several 5 gallon containers full of any leftover seedlings that did'nt make it into the beds.
I know what you're thinking. "That's a little ambitious don't ya think!" Well, let me tell you. Being self employed and hurt by the economic collapse, ambition is all I have. My business was hit hard and if it wasn't for my wife having a secure job with the state, we may very well have been less fortunate. Besides, our garden is just 1 small way to shave off expenses. Not to mention, being rewarded with great tasting fruits and veggies that we are not afraid to put into our bodies. The taste is no comparison to store bought. We do grow organically and swear by compost tea. But we will touch on that in other blog entries later. So get out there everybody! Get those hands dirty. Thank you very much for stopping by to read our 1st of many blog entries. Follow us as we take baby steps towards achieving a more self sufficient life.
Subscribe to:
Posts (Atom)